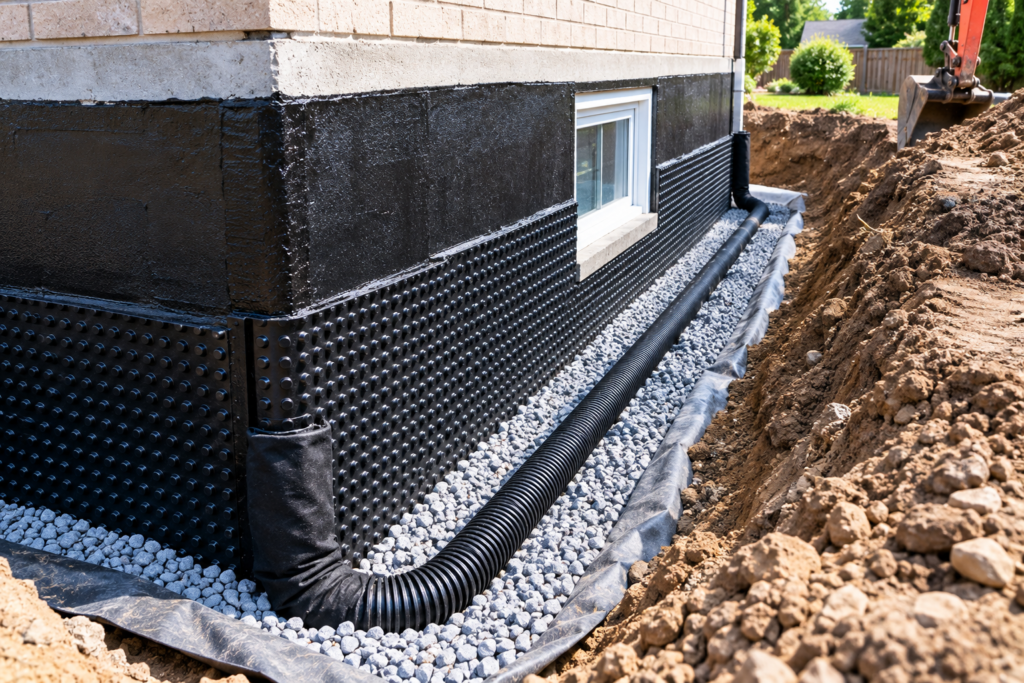
Water appearing inside a basement often begins with conditions outside the house. Rain runs toward the foundation, soil becomes saturated, groundwater accumulates, and moisture searches for vulnerable pathways through cracks, joints, penetrations, and aging foundation materials.
Basement exterior waterproofing approaches the problem from the opposite side of the wall. Instead of waiting for water to reach the interior, the objective is to manage moisture at the exterior foundation and direct water toward an appropriate drainage system.
It can be an extensive project. Excavation may be required, landscaping can be disturbed, and portions of the foundation that have been buried for decades may need to be exposed. Yet exterior access also provides something valuable: an opportunity to inspect and treat the foundation from the soil side.
This guide explains how basement exterior waterproofing works, the materials involved, when it may be appropriate, what the installation process can involve, and which factors influence cost.
Book A Free Inspection
Or
📞 Call Now for a Free Assessment
Article Outline
- What Is Basement Exterior Waterproofing?
- How Water Reaches an Exterior Foundation Wall
- Waterproofing vs. Damp-Proofing
- Signs an Exterior Waterproofing System May Need Attention
- Diagnose the Water Source Before Excavating
- How Soil Conditions Affect Basement Water Problems
- Understanding Hydrostatic Pressure
- Why Exterior Drainage Matters
- How Basement Exterior Waterproofing Works
- Excavating Around the Foundation
- Cleaning and Preparing the Foundation Wall
- Repairing Foundation Cracks Before Waterproofing
- Repairing Holes, Joints and Penetrations
- Exterior Waterproofing Membranes
- Liquid-Applied Waterproofing
- Sheet Membrane Systems
- Dimpled Foundation Membranes
- Protection and Drainage Layers
- Exterior Weeping Tile
- Drainage Stone Around the Foundation
- Filter Fabric and Soil Separation
- Connecting Foundation Drainage to a Sump System
- Backfilling the Excavation
- Restoring Soil and Landscaping
- Exterior Waterproofing Around Basement Windows
- Window Wells and Window-Well Drainage
- Exterior Waterproofing Around Utility Penetrations
- Grading Around the Foundation
- Gutters and Downspouts
- Basement Exterior Waterproofing for Poured Concrete
- Exterior Waterproofing for Concrete-Block Foundations
- Exterior Waterproofing for Older Foundations
- One Wall vs. the Entire Foundation
- Exterior vs. Interior Basement Waterproofing
- Advantages of Exterior Basement Waterproofing
- Limitations of Exterior Waterproofing
- How Much Does Basement Exterior Waterproofing Cost?
- What Makes Exterior Waterproofing More Expensive?
- How Long Does Exterior Waterproofing Take?
- How Long Can Exterior Waterproofing Last?
- Common Exterior Waterproofing Mistakes
- Can Basement Exterior Waterproofing Be a DIY Project?
- Questions to Ask Before Hiring a Waterproofing Contractor
- Frequently Asked Questions
- Basement Exterior Waterproofing in York Region
What Is Basement Exterior Waterproofing?
Basement exterior waterproofing is a method of protecting below-grade foundation walls by working from outside the house. The basic concept is straightforward. Expose the foundation, repair defects, install an appropriate water-resistant or waterproofing system, manage drainage near the footing, and return the excavated area to a properly graded condition. A complete exterior project may involve several components rather than one product:- Foundation repairs
- Waterproofing membrane
- Drainage or protection membrane
- Weeping tile
- Drainage stone
- Filter fabric
- Window-well drainage
- Backfill
- Surface grading
How Water Reaches an Exterior Foundation Wall
A foundation spends its life surrounded by soil. When rain falls or snow melts, some water remains on the surface while another portion infiltrates the ground. Water near the house may originate from:- Rain
- Melting snow
- Roof runoff
- Poorly directed downspouts
- Irrigation
- Poor grading
- High groundwater
- Drainage from neighbouring properties
Waterproofing vs. Damp-Proofing
These terms are frequently used interchangeably, but they aren't necessarily the same. Damp-proofing generally provides resistance against soil moisture and dampness. Waterproofing is intended to provide a more robust barrier against water. Older foundations may have been treated with a basic bituminous coating when the house was constructed. Over time, that coating may deteriorate or prove inadequate for changing site conditions. Modern basement exterior waterproofing may use a combination of membranes, drainage layers and foundation-drainage components rather than depending on a thin coating alone. Understanding what is already on the wall is useful before deciding what should replace or supplement it.Signs an Exterior Waterproofing System May Need Attention
Basement water problems don't always announce themselves with a dramatic flood. More subtle signs can include:- Damp foundation walls
- Water stains
- Efflorescence
- Peeling finishes
- Musty odours
- Repeated wet spots after rain
- Water entering through foundation cracks
- Dampness near the wall-floor junction
- Wet insulation
- Water around basement windows
Diagnose the Water Source Before Excavating
Excavation is disruptive. It shouldn't be the first response to every damp basement. Before considering basement exterior waterproofing, investigate other potential sources. For example, water may originate from:- Plumbing
- Condensation
- A leaking window
- A foundation crack
- Failed window-well drainage
- Poor surface grading
- Roof runoff
- A drainage-system problem
Book A Free Inspection
Or
📞 Call Now for a Free Assessment
How Soil Conditions Affect Basement Water Problems
Soil isn't merely something that surrounds the foundation. It influences how water behaves around it. Some soils allow water to move relatively freely. Others retain moisture for longer periods. Backfill placed around a house during construction can also differ from undisturbed soil farther away. These variations affect how water travels toward and away from the foundation. This is one reason two neighboring houses can experience different basement moisture conditions despite receiving the same rainfall. The ground beneath our feet is surprisingly heterogeneous.Understanding Hydrostatic Pressure
When soil around a foundation becomes saturated, water can exert pressure against below-grade surfaces. This phenomenon is commonly described as hydrostatic pressure. The practical lesson is more important than the terminology: A waterproofing system shouldn't merely resist moisture. It should also help water move away rather than allowing unnecessary accumulation beside the foundation. That is where drainage becomes important. A durable basement exterior waterproofing strategy typically considers both the wall and the water surrounding it.Why Exterior Drainage Matters
Imagine placing a waterproof wall beside soil that continually holds excessive water. Even an excellent membrane is being asked to work under unnecessarily demanding conditions. Now add drainage that allows water to move downward and toward an appropriate collection point. The wall experiences a more manageable environment. Exterior drainage can involve:- Free-draining aggregate
- Foundation drainage pipe
- Drainage membranes
- Filter fabric
- Proper surface grading
How Basement Exterior Waterproofing Works
A typical project can be understood as a sequence. Expose → inspect → repair → waterproof → drain → protect → backfill → restore Each stage prepares for the next. Skipping preparation can compromise membrane adhesion. Installing drainage incorrectly can reduce the benefit of an otherwise good waterproofing layer. Backfilling carelessly can damage newly installed materials. Exterior waterproofing is therefore better understood as a system of coordinated layers than as a single coating applied to a wall.Excavating Around the Foundation
Exterior waterproofing usually begins by exposing the affected foundation. Soil is removed from beside the house, often down toward the footing. The excavation creates working access to the below-grade wall. Several factors influence excavation difficulty:- Foundation depth
- Soil conditions
- Equipment access
- Distance from neighbouring structures
- Utilities
- Decks
- Patios
- Air-conditioning equipment
- Fences
- Landscaping
Cleaning and Preparing the Foundation Wall
A buried foundation can emerge from excavation looking decidedly unglamorous. Soil, deteriorated coatings, loose material and debris may cover the surface. Waterproofing materials need an appropriate substrate. Preparation may involve:- Brushing
- Scraping
- Washing
- Removing loose material
- Allowing surfaces to reach suitable installation conditions
- Repairing defects
Repairing Foundation Cracks Before Waterproofing
A membrane shouldn't be expected to substitute automatically for crack repair. Once the foundation is exposed, visible cracks can be evaluated. Depending on their characteristics, repairs may involve appropriate:- Cementitious materials
- Flexible sealants
- Injection methods
- Patching systems
- Structural repair methods where required
Repairing Holes, Joints and Penetrations
Water doesn't require a dramatic foundation crack. Small discontinuities can matter. Exterior inspection should pay attention to:- Pipe penetrations
- Utility entries
- Form-tie locations
- Construction joints
- Honeycombed concrete
- Wall transitions
- Openings around services
Exterior Waterproofing Membranes
The membrane is one of the central components of basement exterior waterproofing. Its role is to create a continuous water-resistant layer over the prepared foundation surface. Products vary considerably. Possible systems include:- Liquid-applied membranes
- Elastomeric products
- Sheet membranes
- Self-adhering membranes
- Other proprietary foundation systems
Liquid-Applied Waterproofing
Liquid-applied products begin as coatings and form a continuous layer after application and curing. One advantage is their ability to conform to irregular foundation geometry. But application quality matters. The installer needs to consider:- Required thickness
- Surface condition
- Temperature
- Moisture
- Curing
- Coverage
- Detailing around penetrations
Book A Free Inspection
Or
📞 Call Now for a Free Assessment
Sheet Membrane Systems
Sheet membranes arrive as manufactured material rather than being formed entirely on the wall. Depending on the system, they may be adhered, mechanically secured, or installed using another prescribed method. Seams and transitions require careful detailing. Sheet systems can provide consistent manufactured thickness, but installation still determines whether the assembly behaves continuously. Corners, laps and penetrations matter enormously. Water is remarkably adept at exploiting small discontinuities.Dimpled Foundation Membranes
Dimpled membranes have a distinctive textured profile. Their protrusions create separation and can facilitate drainage or protect underlying waterproofing, depending on the specific system. A dimpled membrane should not automatically be treated as synonymous with the primary waterproofing membrane. Products have different intended functions. Some systems use a waterproofing layer against the foundation and a drainage/protection layer outside it. Understanding the role of each layer prevents confusion.Protection and Drainage Layers
After a waterproofing membrane is installed, it may need protection from the materials placed against it. Backfill can contain stones and other debris capable of damaging vulnerable surfaces. Protection layers can shield the waterproofing while drainage layers can help guide water downward. This produces a layered assembly: Foundation wall → waterproofing → protection/drainage → drainage zone → soil Each layer has a job. The strength of the system comes from cooperation between them.Exterior Weeping Tile
In Canada, weeping tile commonly refers to perforated foundation drainage pipe. Modern weeping tile isn't generally ceramic tile. The pipe is typically positioned near the footing to collect water that reaches the bottom of the foundation drainage zone. The collected water then needs somewhere appropriate to go. Depending on the property and system, that may involve a sump arrangement or another permitted drainage destination. A drain that collects water without an effective discharge route is incomplete.Drainage Stone Around the Foundation
Clean drainage aggregate creates open spaces through which water can travel more readily than through compact soil. It is often used around foundation drainage pipe. Its purpose is hydraulic rather than cosmetic. Water entering the drainage zone can migrate toward the weeping tile rather than remaining trapped against the foundation. The material selection and installation should suit the drainage design. Simply filling an excavation with whatever soil happens to be available doesn't reproduce the function of a deliberate drainage layer.Filter Fabric and Soil Separation
Fine soil particles can migrate into drainage aggregate over time. Filter or geotextile materials may be incorporated to help separate soil from the drainage zone while permitting water movement. Think of this as preserving the porosity of the drainage assembly. Without appropriate separation, fine material can gradually occupy spaces intended for water flow. The specific placement depends on the drainage design.Connecting Foundation Drainage to a Sump System
Some foundation drainage systems direct collected water toward a sump basin. The sump pump then evacuates the water away from the basement. This creates a chain: Groundwater → drainage zone → weeping tile → sump basin → pump → discharge Every link matters. If the pump fails, the system can lose its final evacuation mechanism. Where a sump system plays an important role in waterproofing, homeowners may want to consider:- Backup power
- Secondary pumping
- High-water alarms
- Routine testing
Backfilling the Excavation
Once repairs, waterproofing and drainage work are complete, the excavation must be filled. This isn't simply a matter of pushing soil back into the trench. Care is needed to avoid damaging the newly installed waterproofing system. Backfill conditions can also influence settlement around the house afterward. The finished grade should support surface drainage away from the foundation where practical. A successful waterproofing project shouldn't conclude with a depression that funnels rainwater back toward the wall.Restoring Soil and Landscaping
Exterior waterproofing can temporarily transform a tidy side yard into a construction zone. After backfilling, restoration may involve:- Topsoil
- Sod
- Gardens
- Shrubs
- Fences
- Interlocking stone
- Walkways
- Steps
Book A Free Inspection
Or
📞 Call Now for a Free Assessment
Exterior Waterproofing Around Basement Windows
Below-grade windows deserve special attention. Water may enter around:- The frame
- Foundation joints
- Nearby cracks
- Window-well connections
- Drainage openings
Window Wells and Window-Well Drainage
A window well behaves like a small excavation beside the foundation. That makes drainage particularly important. If the well fills with water, the basement window can experience considerable exposure. A functional arrangement may involve:- Secure window well
- Suitable aggregate
- Drainage
- Appropriate cover where useful
- Proper surrounding grade
Exterior Waterproofing Around Utility Penetrations
Gas lines, electrical services, plumbing and other utilities may penetrate foundation walls. Every penetration interrupts the continuity of the wall. During exterior waterproofing, these areas require careful detailing using materials appropriate for the application. Accessibility and utility safety are also important during excavation. Before digging, underground services need to be identified through the appropriate local process. Never assume the soil beside a house is empty.Grading Around the Foundation
One of the simplest waterproofing concepts happens above ground. Surface water should generally be encouraged to move away from the house rather than toward it. Negative grading creates the opposite effect. Water collects beside the foundation, increasing the moisture burden on below-grade systems. After excavation, grading should therefore be treated as part of the water-management strategy. The membrane handles water at the wall. Good grading tries to prevent unnecessary water from arriving there in the first place.Gutters and Downspouts
A roof collects a surprisingly large amount of water during heavy rain. Gutters concentrate that water. Downspouts decide where it goes. If roof runoff is discharged immediately beside the foundation, the waterproofing system has to deal with water that could potentially have been directed farther away. Inspect:- Clogged gutters
- Disconnected downspouts
- Short discharge extensions
- Eroded areas near outlets
- Water flowing back toward the house
Basement Exterior Waterproofing for Poured Concrete
Poured-concrete foundations can develop cracks, construction joints and penetration-related vulnerabilities. Exterior access allows these areas to be examined from the soil side before waterproofing materials are applied. The specific repair depends on the condition. Once appropriate repairs are completed, the exterior waterproofing and drainage assembly can be installed over the prepared wall. A poured-concrete foundation shouldn't automatically receive the same treatment as every other foundation. Condition dictates method.Exterior Waterproofing for Concrete-Block Foundations
Concrete-block walls behave differently. They contain:- Individual masonry units
- Mortar joints
- Internal cavities
Exterior Waterproofing for Older Foundations
Older York Region homes may have foundation construction or drainage details that differ from newer properties. An excavation can reveal:- Aging coatings
- Previous repairs
- Older drainage materials
- Irregular foundation surfaces
- Deteriorated mortar
- Unexpected transitions
One Wall vs. the Entire Foundation
Does exterior waterproofing require digging around the whole house? Not necessarily. If the problem is clearly isolated to one accessible wall, a localized exterior project may be appropriate. Other properties may have moisture problems affecting several sides. The correct scope depends on:- Water-entry pattern
- Foundation condition
- Drainage system
- Site grading
- Previous repairs
- Future renovation plans
Exterior vs. Interior Basement Waterproofing
Both approaches can play legitimate roles.Exterior waterproofing
Works from the soil side of the foundation and attempts to stop or manage water before it reaches the interior wall.Interior waterproofing
Works from inside and may intercept or manage water after it reaches the foundation structure. Exterior work can provide direct access to the outside face of the wall but requires excavation. Interior systems avoid exterior excavation but may require opening basement floors or finishes. The correct choice depends on the water source, property configuration, access, budget, and desired repair strategy. It isn't simply a contest between “good” and “bad” methods.Book A Free Inspection
Or
📞 Call Now for a Free Assessment
Advantages of Exterior Basement Waterproofing
When appropriate, basement exterior waterproofing offers several potential advantages. It allows contractors to:- Inspect the exterior foundation directly
- Repair exterior defects
- Apply waterproofing at the soil-facing surface
- Address foundation drainage
- Improve drainage layers
- Correct certain window-well issues
- Coordinate waterproofing with grading
Limitations of Exterior Waterproofing
Exterior work isn't practical in every situation. Potential challenges include:- Restricted side-yard access
- Attached structures
- Decks
- Patios
- Driveways
- Utilities
- Landscaping
- Deep foundations
- Neighbouring properties
How Much Does Basement Exterior Waterproofing Cost?
Exterior waterproofing is usually priced according to project scope rather than basement square footage alone. For preliminary planning, a broad range of approximately $100–$300 per linear foot can sometimes be useful for exterior foundation waterproofing. For example: 40 linear feet × $100 = $4,000 40 linear feet × $300 = $12,000 These figures should be treated strictly as planning ranges. A substantial project involving difficult excavation, deep foundations, drainage replacement and significant restoration could exceed them. Conversely, a smaller localized repair may cost less than a large-wall calculation suggests. An on-site inspection is needed for a property-specific quote.What Makes Exterior Waterproofing More Expensive?
The foundation length is only one variable. Cost can rise because of:- Deep excavation
- Restricted equipment access
- Hand digging
- Concrete removal
- Interlocking stone
- Decks
- Utility conflicts
- Extensive crack repairs
- Drainage replacement
- Window wells
- Sump modifications
- Landscaping restoration
- Complex foundation geometry
How Long Does Exterior Waterproofing Take?
Project duration varies. A small accessible wall may progress relatively quickly. A larger project involving multiple walls, difficult access, drainage replacement, extensive repairs and restoration can take considerably longer. Weather matters too. Exterior excavation and membrane installation may depend on suitable conditions. When requesting estimates, ask contractors about:- Expected project duration
- Weather delays
- Site access
- Restoration schedule
- When excavated areas can be used normally again
How Long Can Exterior Waterproofing Last?
There is no universal expiration date for basement exterior waterproofing. Longevity depends on the complete system and surrounding conditions. Important factors include:- Foundation movement
- Material quality
- Installation quality
- Drainage performance
- Soil conditions
- Surface grading
- Membrane protection
- Maintenance of sump equipment
- Changes to the property
Book A Free Inspection
Or
📞 Call Now for a Free Assessment
Common Exterior Waterproofing Mistakes
Several mistakes can compromise otherwise substantial work.Waterproofing without diagnosing the source
Excavation may be unnecessary or incorrectly located.Applying material over poorly prepared surfaces
Waterproofing needs a suitable substrate.Ignoring cracks before covering the wall
Defects should be evaluated while they are exposed.Treating membrane and drainage as interchangeable
They perform different functions.Ignoring weeping tile condition
Foundation drainage is a major component of water management.Poor window-well drainage
A vulnerable opening remains vulnerable.Backfilling carelessly
Newly installed materials can be damaged.Finishing with poor grading
Surface water is invited back toward the foundation. Exterior waterproofing should conclude with better water management, not merely a buried membrane.Can Basement Exterior Waterproofing Be a DIY Project?
Minor surface-water improvements can often be handled by homeowners. Examples may include cleaning gutters, correcting simple downspout issues, or making modest landscaping improvements where appropriate. Full exterior foundation waterproofing is different. It can involve:- Deep excavation
- Underground utilities
- Trench safety
- Heavy soil
- Foundation repair
- Drainage installation
- Waterproofing specifications
- Backfilling
Questions to Ask Before Hiring a Waterproofing Contractor
A detailed proposal is more useful than a low number with little explanation. Ask:- What is causing the water problem?
- Which foundation walls require work?
- How deep will excavation go?
- How will cracks be repaired?
- What waterproofing membrane will be used?
- Is a drainage membrane included?
- Will existing weeping tile be inspected?
- Is new drainage pipe included?
- Where will collected water discharge?
- How will window wells be handled?
- What happens to landscaping?
- Is backfilling included?
- Is final grading included?
- What restoration is excluded?
- What warranty applies?
- What conditions could change the price?
Frequently Asked Questions About Basement Exterior Waterproofing
Is basement exterior waterproofing better than interior waterproofing?
Neither method is universally better. Exterior waterproofing addresses water from outside the foundation, while interior systems can manage water from inside. The appropriate approach depends on the source of the problem and property conditions.Does exterior waterproofing require excavation?
Usually, meaningful exterior foundation waterproofing requires access to the below-grade wall, which commonly means excavation.Can only one basement wall be waterproofed from outside?
Yes, in some situations. If the problem is localized and the affected wall can be clearly identified, partial exterior waterproofing may be appropriate.Does exterior waterproofing include weeping tile?
Not automatically. Ask whether inspection, repair, or replacement of the foundation drainage system is included in the proposal.Is a dimpled membrane waterproof?
Its exact function depends on the product and system. Some dimpled materials primarily provide drainage and protection rather than serving as the sole primary waterproofing layer.Can exterior waterproofing stop foundation-crack leaks?
Exterior work can provide access to repair cracks and protect the repaired wall, but the crack should first be evaluated to determine the appropriate repair method.Can waterproofing be completed without fixing the grading?
Technically, different repairs can be performed independently, but poor grading may continue sending unnecessary surface water toward the foundation. Surface drainage deserves consideration as part of the overall strategy.Does exterior waterproofing prevent every basement leak?
No. Plumbing leaks, condensation, sewer backups and other moisture sources are not automatically solved by exterior foundation waterproofing.Should landscaping be removed before waterproofing?
Anything obstructing the excavation area may need removal or relocation. Discuss responsibility for removal and restoration before the project begins.Can exterior waterproofing be installed during winter?
Weather, frozen soil, material specifications and site conditions can affect exterior work. Contractors should determine whether conditions are appropriate for the proposed system.Basement Exterior Waterproofing in York Region
Homes throughout Newmarket, Aurora, Richmond Hill, East Gwillimbury, Bradford, Stouffville, King, Keswick, and surrounding York Region communities can experience significant seasonal changes in the amount of moisture surrounding their foundations. Heavy rainfall can saturate soil. Spring thaw can introduce large amounts of meltwater over a relatively short period. Older drainage components may no longer perform as they once did, while landscaping changes made years after construction can gradually alter how surface water travels around a property. For these reasons, basement exterior waterproofing should begin with a property-specific investigation. A homeowner in Richmond Hill may have a narrow side yard where excavation access is the dominant challenge. A property in East Gwillimbury may provide considerably more working room but have a long foundation wall requiring treatment. A Newmarket home might have a localized crack that leaks during heavy rainfall. Another house only a few streets away could have a broader foundation-drainage problem. The visible symptom—water in the basement—doesn't tell the entire story. A sensible exterior-waterproofing plan therefore follows a logical progression: Identify where the water originates. Determine how it reaches the foundation. Inspect the condition of the affected wall. Repair vulnerable areas. Create an appropriate waterproofing barrier. Provide drainage for water beside the foundation. Restore the property so surface water moves in a favourable direction. That approach treats the foundation as part of a complete water-management system rather than an isolated concrete wall. If water repeatedly appears along a basement wall, around a foundation crack, or near a basement window after heavy rain, request a free inspection to identify the likely source and determine whether exterior waterproofing, interior drainage, a localized repair, or another solution may be appropriate for your York Region home.Book A Free Inspection
Or
This article provides general homeowner information. Waterproofing methods, drainage requirements, excavation conditions, costs, permits, and suitable materials vary by property. A site assessment is necessary before selecting a specific repair method.