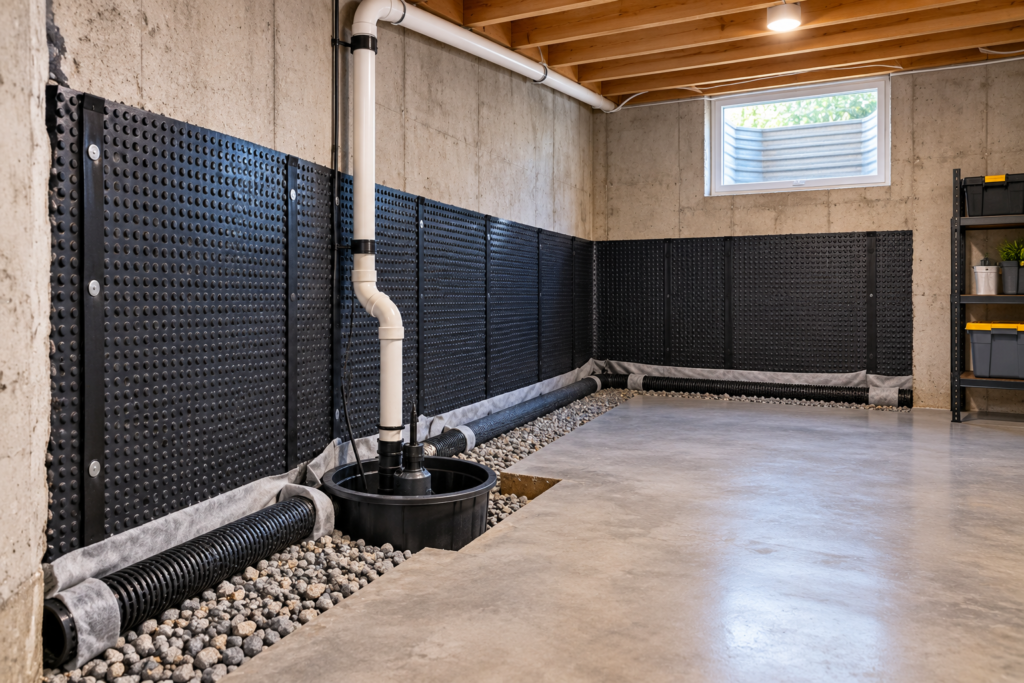
Water showing up in a basement can be frustrating because the place where you discover the moisture does not always reveal where the journey began. A puddle beside a wall may have originated from a crack, groundwater beneath the floor, a troublesome window well, or drainage conditions outside the house.
That is why waterproofing basements from inside should begin with investigation rather than a bucket of sealant.
Interior waterproofing can range from repairing one identifiable leak to constructing a concealed drainage route beneath the perimeter of the basement floor. The appropriate approach depends on how the water is getting into the building.
This guide examines the different ways homeowners can manage basement water from indoors, how interior drainage functions, what its limitations are, and when another type of repair may make more sense.
Article Outline
- What Waterproofing a Basement From Inside Actually Means
- Why Water Appears Inside Basements
- Start With Diagnosis, Not Waterproofing Products
- Where to Look When Tracking a Basement Leak
- Why Rainfall Patterns Matter
- What Happens When Soil Around a Foundation Becomes Saturated
- Three Different Levels of Interior Water Control
- Repairing an Individual Foundation Crack
- Understanding Polyurethane Crack Injection
- When Epoxy May Be Considered
- Managing Water at the Bottom of the Wall
- How an Interior Drainage Trench Works
- What Interior Weeping Tile Actually Does
- Why Drainage Stone Is Used
- How Wall Drainage Membranes Fit Into the System
- Where Collected Water Goes
- Understanding the Sump Basin
- Why the Sump Pump Matters
- Planning for Pump or Power Failure
- Can Basement Walls Simply Be Sealed?
- The Limitations of Waterproof Paint
- Water Entering Through the Basement Floor
- Waterproofing a Finished Basement
- Waterproofing an Unfinished Basement
- When Interior Waterproofing Makes Practical Sense
- Situations Where Interior Work May Not Be Enough
- Interior Waterproofing vs. Exterior Excavation
- How Long Interior Waterproofing Takes
- Maintaining an Interior Waterproofing System
- Mistakes Homeowners Should Avoid
- DIY Interior Waterproofing
- Choosing a Waterproofing Contractor
- Frequently Asked Questions
- Waterproofing Basements From Inside in York Region
What Does Waterproofing a Basement From Inside Actually Mean?
Waterproofing basements from inside does not describe one particular product. It is an umbrella term for several methods of controlling moisture or water using access from within the basement. At the simplest level, this could mean repairing an isolated crack. At the other end of the spectrum, contractors can open the perimeter of the concrete floor and construct a drainage system underneath it. Water is captured before it can spread across the room and is routed toward a collection point. An interior project might therefore involve:- Foundation crack treatment
- Perimeter drainage
- Drainage membrane
- Sump basin
- Sump pump
- Backup pump
- Drainage stone
- Concrete restoration
Why Does Water Appear Inside Basements?
A basement occupies an unusual part of a house. Most of it sits below the surrounding ground. While an upstairs wall is primarily exposed to weather and air, a basement foundation may spend decades pressed against soil containing varying amounts of moisture. Water can find surprisingly small routes into the building. Possible entry points include:- Concrete cracks
- Masonry joints
- Openings around pipes
- Basement windows
- Floor cracks
- Gaps around penetrations
- The junction between foundation wall and floor
Start With Diagnosis, Not Waterproofing Products
Walk into a home-improvement store and you will find paints, sealants, hydraulic cement, crack fillers, coatings, and other products promising protection from water. Those products may have legitimate applications. But none can tell you why your basement is wet. Diagnosis comes first. Ask: Where did the water first appear? What happened outside immediately beforehand? Does the problem occur after every rainfall or only major storms? Is there a visible crack? Is the water concentrated near a window? Does moisture appear where the floor meets the wall? Is the basement damp even during dry weather? These observations begin building a history of the leak. That history can be more useful than immediately covering the evidence.Where Should You Look When Tracking a Basement Leak?
Begin at the wet area and work outward. Inspect the foundation wall for cracks and staining. Look at the bottom of the wall. Check nearby windows. Then go outside and inspect the corresponding area. You may discover a downspout terminating beside the foundation, depressed soil collecting rainwater, an overflowing window well, or another obvious contributor. Sometimes there is no visible exterior clue. That's useful information too. The objective is not to prove a theory. It is to eliminate possibilities until the water pathway becomes clearer.Why Rainfall Patterns Matter
Timing can provide valuable evidence. Suppose the basement remains completely dry through several light showers but develops water after a day of persistent rain. That pattern is different from a leak appearing immediately every time rain touches one particular window. Likewise, water during spring thaw can point toward conditions different from a pipe that drips throughout the year. Keep notes if the problem is intermittent. Record:- Approximate rainfall
- Where moisture appeared
- How much water was present
- How quickly it appeared
- How long it remained
What Happens When Soil Around a Foundation Becomes Saturated?
Soil contains spaces between its particles. During prolonged rainfall or snowmelt, those spaces can fill with water. As moisture accumulates around and beneath the foundation, the conditions surrounding the basement change. Water can exploit cracks, joints, porous materials, and other available pathways. This is one reason a basement can remain dry during ordinary rain yet leak during unusually wet periods. The water isn't necessarily appearing because a brand-new hole suddenly formed. Existing weaknesses may simply become apparent when surrounding moisture conditions become more severe.Three Levels of Waterproofing Basements From Inside
It can be helpful to think of interior water control in three broad levels.Level 1: Local repair
One identifiable defect is treated, such as an isolated leaking crack.Level 2: Surface moisture management
Coatings, humidity management, or other treatments are used for limited moisture conditions where active groundwater intrusion is not the primary problem.Level 3: Drainage-based water management
A physical drainage pathway is installed to collect incoming water and transport it to a sump or another suitable destination. These approaches shouldn't be considered interchangeable. A Level 1 problem doesn't necessarily justify Level 3 construction. And a severe drainage problem shouldn't be treated as though it were merely surface dampness.Repairing an Individual Foundation Crack From Inside
One of the least disruptive approaches to waterproofing basements from inside is treating an accessible crack. Imagine a basement that remains dry almost everywhere, but one vertical crack becomes wet during major storms. If inspection indicates that this crack is responsible for the infiltration, targeted repair may be more sensible than constructing drainage around the entire basement. Interior crack treatment can avoid digging outside. It also limits disruption inside. But the word if matters. A crack that is moving or associated with displacement can require a different assessment than a straightforward water-entry route. Waterproofing and structural repair are related fields, but they aren't synonymous.Understanding Polyurethane Crack Injection
Polyurethane is frequently used to address leaking cracks in poured concrete. Rather than merely covering the visible line on the wall, injection introduces material into the crack itself. The goal is to obstruct the pathway that water has been using. One advantage is localization. The surrounding wall can remain largely untouched. However, injection cannot correct an unrelated drainage failure elsewhere around the foundation. If water starts appearing from multiple locations, repeatedly injecting cracks may amount to treating individual symptoms of a larger problem.When Might Epoxy Be Considered?
Epoxy is another material associated with concrete crack repair. It cures differently from flexible polyurethane materials and may be selected for different repair objectives. Homeowners do not need to become material scientists. They should ask a simpler question: Why is this material appropriate for my particular crack? A contractor should be able to explain whether the objective is water sealing, concrete repair, structural bonding, or some combination of these. Product selection should follow diagnosis. Not the other way around.Managing Water at the Bottom of the Basement Wall
Sometimes there is no obvious wet crack halfway up the wall. Instead, water appears along the basement perimeter. You might see a narrow wet strip exactly where the wall and floor meet. This location is important because the basement wall and floor are not generally poured as one continuous piece at the same time. The junction can become a visible place for groundwater to emerge. In this situation, smearing sealant along the visible line may not address the underlying water conditions. A drainage strategy may be more appropriate.How Does an Interior Drainage Trench Work?
This is where waterproofing basements from inside becomes more substantial. Workers typically open a narrow strip of concrete near the foundation wall. The concrete is removed. Material beneath it is excavated. This creates a channel where drainage components can be installed below the finished floor elevation. Once completed, the floor is closed again with concrete. The drainage route remains hidden beneath the perimeter. Instead of emerging into the room, water reaching this area enters the drainage system.What Does Interior Weeping Tile Actually Do?
The term weeping tile survives from older construction practices, but modern installations typically use perforated drainage pipe. Small openings in the pipe allow surrounding water to enter. The pipe is installed with a route toward the collection point. Gravity does much of the work. Water enters. Water travels. Water reaches the sump. The system functions much like hidden infrastructure beneath the floor rather than a visible gutter running through the basement.Why Is Drainage Stone Used?
Drainage pipe cannot work effectively if it is simply packed tightly into unsuitable material. Clean stone around drainage components creates voids through which water can migrate more readily toward the pipe. The stone therefore participates in the drainage assembly rather than merely filling empty space. This is a good example of why an interior waterproofing system should be evaluated as a system. Pipe, stone, sump, pump, membrane, and discharge route all have different jobs. One impressive component cannot compensate for a poorly conceived overall design.How Do Interior Wall Membranes Fit Into the System?
Imagine water making its way through a foundation wall several feet above the basement floor. A drainage pipe underneath the floor can eventually receive that water—but first it needs a controlled route downward. An interior drainage membrane can provide that route. Installed against the foundation wall, the membrane creates a separation between the damp foundation and the usable basement side. Moisture travels behind the membrane and reaches the drainage area below. This is quite different from simply painting the wall. The system accepts that moisture may reach the interior side of the foundation and then manages where it goes.Where Does the Collected Water Go?
Every drainage system eventually needs an exit strategy. Collecting water beneath the floor accomplishes little if there is nowhere for that water to go. Many interior systems direct it toward a sump basin. The basin sits lower than the basement floor and receives drainage water. Once the water level reaches the pump's activation point, the pump sends it through a discharge pipe. That discharge route is part of the waterproofing strategy. Water should not simply be deposited somewhere that allows it to migrate straight back toward the foundation.Understanding the Sump Basin
Think of the sump basin as a small underground collection reservoir. It provides temporary storage for water arriving through the drainage system. This allows the pump to cycle as required rather than operating continuously whenever a small amount of water reaches the pipe. The basin should be appropriately configured for the system. Its cover, pump arrangement, drainage connections, and accessibility for maintenance all deserve consideration. A sump pit is not simply a hole in the basement floor. It is a working component of the drainage infrastructure.Why the Sump Pump Matters
The drainage system may collect water perfectly. But if the sump fills and cannot empty, the system eventually loses its ability to manage additional water. That makes the pump crucial. A float or other switching mechanism detects rising water and activates the pump. The pump then pushes water through the discharge line. Homeowners should know:- What pump has been installed
- How it is powered
- Where it discharges
- How it can be tested
- What happens if it stops working
Planning for Pump or Power Failure
Consider the unfortunate sequence: Heavy rain saturates the ground. Drainage begins sending large quantities of water toward the sump. A storm knocks out electricity. The primary pump stops. This is why some homeowners add backup protection. A secondary battery-powered pump can provide temporary pumping capacity during certain failures. It is not maintenance-free. Batteries deteriorate and pumps can fail. But redundancy can be valuable when the entire drainage system depends on mechanical water removal.Can Basement Walls Simply Be Sealed?
Sometimes a surface treatment is appropriate. Sometimes it isn't. The word seal sounds reassuring because it implies creating an impenetrable barrier. Real foundations are more complicated. If the problem is mild surface moisture, a suitable coating may contribute to moisture management. If groundwater is actively entering through a crack or accumulating at the wall-floor junction, coating the visible surface may not address the process producing the leak. Before sealing anything, ask what is happening behind the surface.Why Waterproof Paint Has Limitations
Waterproof paint is attractive because it is inexpensive and accessible. It can also make an unattractive concrete wall look cleaner. But appearance and water control aren't the same thing. If moisture is being driven through masonry from the soil side, an interior coating becomes the last thin layer standing between that moisture and the room. Under difficult conditions, coatings may blister, debond, or simply encourage water to emerge somewhere else. Use coatings for problems they are designed to address. Don't ask them to substitute for drainage when drainage is what the basement actually needs.What If Water Is Coming Through the Basement Floor?
A foundation wall may be completely dry while the floor tells a different story. Homeowners sometimes find:- Damp areas beneath flooring
- Water emerging through floor cracks
- Moisture around penetrations
- Puddling away from the walls
Waterproofing a Finished Basement From Inside
Finished basements introduce a practical complication: the foundation is hidden. A beautifully painted wall might conceal concrete, insulation, framing, and utilities. Interior waterproofing may require selective removal of these finishes to gain access to the floor perimeter and foundation. Flooring may also need attention. Ask the waterproofing company specifically where demolition will occur and where its responsibility ends. Some companies restore concrete but not drywall. Others may provide broader restoration. Knowing this beforehand makes budgeting much easier.Waterproofing an Unfinished Basement From Inside
An unfinished basement offers one significant advantage: visibility. Foundation walls are easier to inspect. Cracks are easier to monitor. The perimeter is easier to reach. There is also less finished material to remove before construction begins. If you plan to finish an unfinished basement that has a history of moisture, addressing that history before installing walls and flooring is sensible. Water problems are much easier to investigate when they aren't concealed behind a newly renovated room.When Does Interior Waterproofing Make Practical Sense?
Waterproofing basements from inside can be particularly attractive when exterior excavation would be unnecessarily disruptive or difficult. Examples include homes with:- Narrow side yards
- Large decks
- Patios against the house
- Closely neighbouring buildings
- Expensive landscaping
- Difficult excavation access
When Might Interior Waterproofing Not Be Enough?
Some problems exist outside the foundation and deserve attention there. Examples can include:- Failed exterior drainage
- Severe foundation deterioration
- Exterior defects requiring direct repair
- Problematic grading
- Overflowing window wells
- Roof water concentrated beside the house
Interior Waterproofing vs. Exterior Excavation
A useful way to compare the two methods is to consider their point of intervention. Exterior work intervenes before or as water reaches the outside foundation surface. Interior drainage intervenes after water reaches the foundation assembly and before it can enter the usable basement uncontrollably. Exterior work provides access to buried foundation surfaces but requires excavation. Interior work avoids much of that exterior disruption but generally does not stop soil moisture from reaching the outside wall. Understanding this distinction makes contractor proposals much easier to evaluate.How Long Does Interior Waterproofing Take?
Project duration depends heavily on scope. Injecting one crack and constructing drainage around an entire basement clearly shouldn't have the same timeline. A perimeter project can involve:- Preparing and protecting the basement
- Removing necessary finishes
- Cutting concrete
- Removing broken material
- Excavating the perimeter channel
- Installing drainage components
- Installing the sump system
- Adding wall membrane where required
- Replacing concrete
- Cleaning the work area
Maintaining an Interior Waterproofing System
The concrete may hide the drainage pipe, but the system shouldn't disappear from the homeowner's attention. The sump pump needs periodic inspection. Backup equipment needs maintenance. The discharge route should remain unobstructed. Exterior water management should continue too. Keep gutters functioning. Watch downspouts. Inspect window wells. Look for significant changes in grading. A good interior drainage system and good exterior water management complement one another.Mistakes to Avoid When Waterproofing Basements From Inside
Covering evidence before identifying the leak
Photograph and investigate wet areas before painting or rebuilding.Assuming all basement moisture is groundwater
Condensation and plumbing problems can produce similar symptoms.Treating every crack identically
Cracks have different characteristics and may require different responses.Depending entirely on waterproof paint
Surface coating and subsurface drainage perform different functions.Forgetting where sump water goes
Discharge is part of the system.Ignoring backup protection
Understand what happens during pump or electrical failure.Renovating immediately after a leak
Resolve and observe the water problem before hiding the foundation behind expensive finishes.Can Waterproofing Basements From Inside Be a DIY Project?
Some moisture-management tasks are suitable for capable homeowners. Checking gutters is straightforward. Inspecting downspouts is straightforward. Controlling indoor humidity can be straightforward. A complete interior perimeter drainage installation is another matter. Breaking the slab near the foundation, excavating correctly, designing drainage, installing sump equipment, handling electrical requirements, and restoring concrete require considerably more knowledge and equipment. DIY work can become particularly problematic if excavation interferes with the footing or if water is redirected incorrectly. For significant recurring infiltration, diagnosis is a sensible place to seek professional help.How to Evaluate an Interior Waterproofing Proposal
A good proposal should describe a water pathway, not merely a shopping list. Ask the contractor to explain: Where is the water originating? How will your system intercept it? Where will the water travel? Where will it ultimately be discharged? Then examine the practical details:- How many linear feet are included?
- Is the entire perimeter necessary?
- What drainage material will be installed?
- Is wall membrane included?
- Is a sump basin included?
- What pump is specified?
- Is backup available?
- What concrete restoration is included?
- What finished-basement restoration is excluded?
- What maintenance is required?
- What does the warranty cover?