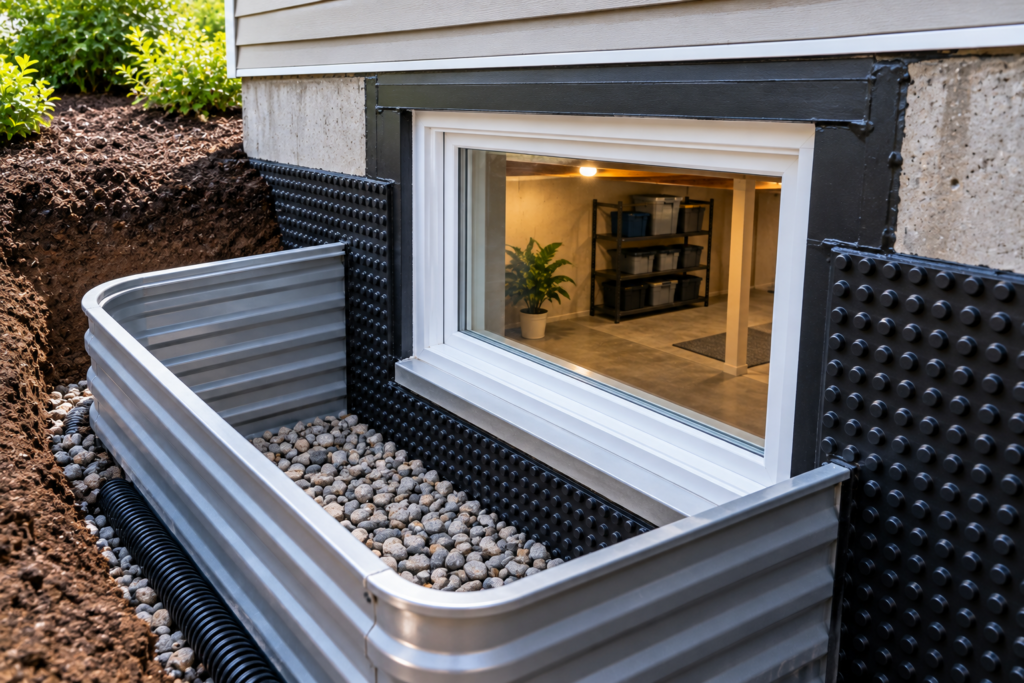
A wet area beneath a basement window can be deceptive. The obvious assumption is that the window itself has failed, but the actual water source may be several feet away. Rain can migrate through soil, travel along concrete, collect inside a recessed window area, or follow a foundation defect before finally appearing indoors.
For that reason, the best way to waterproof basement windows is to investigate the entire area surrounding the opening rather than treating the glass and frame in isolation.
A lasting solution may involve improving surface-water control, restoring the frame-to-concrete joint, correcting the window well, repairing nearby concrete, or providing water with a reliable drainage route.
This guide approaches basement windows as part of the home's larger water-management system and explains how to diagnose and address the most common trouble spots.
Book A Free Inspection
Or
📞 Call Now for a Free Assessment
Article Outline
- What Does It Really Mean to Waterproof Basement Windows?
- Think Beyond the Window Frame
- Start With a Rain-Day Investigation
- Map the First Appearance of Water
- Separate Condensation From Exterior Leakage
- Examine the Concrete Opening Around the Window
- Inspect the Lower Sill Area
- Look for Hidden Water Paths
- Evaluate the Window Well as a Small Drainage Zone
- Check the Height of the Window Well
- Study the Soil Immediately Around the Well
- Track Roof Water Near the Window
- Understand What the Stone at the Bottom of a Well Does
- Determine Whether a Window-Well Drain Is Working
- What to Do When a Window Well Holds Water
- Using a Window-Well Cover Correctly
- Sealing the Window-to-Foundation Joint
- Choosing an Exterior Sealant
- Preparing Old Joints Before Resealing
- Repairing Deteriorated Concrete Around a Window
- Foundation Cracks Beside Window Openings
- Waterproof Basement Windows From the Exterior
- What Interior Repairs Can Accomplish
- Why Interior Caulking Sometimes Fails
- Waterproofing Replacement Basement Windows
- Special Considerations for Egress Windows
- Managing Snow Around Basement Windows
- Preparing for Spring Snowmelt
- Protecting Basement Windows During Severe Rain
- When a Basement Window Needs Replacement
- When the Window Is Innocent
- Mistakes That Can Make Window Leaks Worse
- A Step-by-Step Basement Window Inspection
- DIY Repairs vs. More Extensive Waterproofing
- Preventive Maintenance
- Frequently Asked Questions
- Waterproof Basement Windows in York Region
What Does It Really Mean to Waterproof Basement Windows?
The phrase waterproof basement windows sounds as though the objective is simply to seal the window tightly enough that water cannot pass through it. Below ground level, things are more complicated. The window is only one component of a larger assembly consisting of the frame, concrete opening, sill, exterior joints, surrounding soil, window well, and drainage. For reliable moisture control, these components need to cooperate. A useful way to think about the process is: Keep surface water away → provide drainage for unavoidable water → maintain the exterior opening → protect the interior. That hierarchy is important. Stopping water before it accumulates against a basement window is usually preferable to attempting to contain it after it gets there.Think Beyond the Window Frame
When water appears underneath a window, the frame gets blamed immediately. Sometimes correctly. But water doesn't always travel in a straight line. It can migrate through a crack in the adjacent concrete, travel behind insulation, follow the perimeter of an opening, and emerge somewhere that appears unrelated to the original entry point. Therefore, inspect an area larger than the window itself. Look above it. Look beside it. Inspect the concrete beneath it. Then go outside and study the corresponding area of the foundation. This wider investigation can prevent replacing a perfectly functional window while leaving the real leak untouched.Start With a Rain-Day Investigation
A dry-day inspection tells you what the basement looks like. A rain-day inspection can tell you how it behaves. When conditions are safe, observe the troublesome window during rainfall. Do not wait until several hours after the storm. Look early. The location where moisture first becomes visible can provide a valuable clue. You may notice a small bead forming at a corner long before water reaches the floor. Or the interior may remain dry until water outside rises close to the bottom of the window. These two observations point toward very different problems. Take photographs. Write down the time. Then compare what happens during light and heavy rain. That small record can be surprisingly useful when trying to waterproof basement windows effectively.Map the First Appearance of Water
Think like an investigator rather than a repair person. The first objective isn't to stop the water. It is to understand it. If moisture begins: At the top of the frame: inspect the upper exterior joint and nearby wall. At one vertical side: investigate that perimeter connection and adjacent concrete. At the lower frame: examine sill details and exterior water accumulation. Through a visible concrete crack: investigate the crack separately from the window. Across several areas simultaneously: consider whether water is accumulating outside the entire opening. Marking the initial wet location with removable tape can help when the area later becomes broadly saturated.Separate Condensation From Exterior Leakage
Not every wet basement window is leaking. Condensation can create remarkably similar symptoms. Warm, moisture-laden indoor air contacting cold glass can produce droplets. Those droplets can run down the glass and collect along the sill. A useful distinction is timing. If moisture develops during humid conditions without rain, condensation becomes more plausible. If water consistently appears after rainfall or snowmelt, exterior water deserves greater attention. Sometimes both conditions exist. Replacing exterior sealant will not correct excessive indoor humidity, just as running a dehumidifier won't repair rainwater entering around a foundation opening. Correct identification matters.Examine the Concrete Opening Around the Window
Basement windows are installed within openings formed or cut into the foundation. Inspect the perimeter carefully. Look for:- Deteriorated concrete
- Voids
- Crumbling mortar
- Small fractures
- Separation around the frame
- Previous patches
- Gaps around fasteners
Inspect the Lower Sill Area
The bottom of a basement window deserves special attention because gravity directs water toward it. Inspect the exterior sill or lower opening. Does it encourage water to move outward? Or does it contain depressions where water remains? Check for cracks and deteriorated material as well. A small reservoir immediately beneath the window provides water with plenty of time to exploit a weak joint. When trying to waterproof basement windows, the objective should be to discourage prolonged water contact wherever practical.Book A Free Inspection
Or
📞 Call Now for a Free Assessment
Look for Hidden Water Paths
Water is opportunistic. It may enter a wall at one elevation and become visible somewhere lower. This can happen behind:- Drywall
- Insulation
- Framing
- Trim
- Vapor-control materials
Evaluate the Window Well as a Small Drainage Zone
A window well is essentially a recessed area constructed beside the foundation so a below-grade window can remain exposed. That makes the well a miniature landscape. It has:- A perimeter
- A bottom elevation
- Surface material
- Drainage
- Adjacent soil
- A relationship with surrounding grade
Check the Height of the Window Well
Walk outside and compare the top of the well with the surrounding ground. The relationship may have changed since the well was originally installed. Soil gets added. Gardens are created. Mulch accumulates. Sod is replaced. Walkways are rebuilt. Over years, the surrounding grade can creep upward until runoff can flow over the edge of the well. If this is happening, the waterproofing problem isn't necessarily at the window. The surrounding landscape may simply be delivering too much water into the opening.Study the Soil Immediately Around the Well
Stand several feet away and look toward the foundation. Imagine pouring a bucket of water onto the ground. Where would it travel? Depressions near the house can collect rainfall and direct it toward the window area. Look for subtle topographical clues:- Low spots
- Eroded channels
- Settled soil
- Depressions beside the foundation
- Garden borders that retain water
- Hard surfaces pitched toward the house
Track Roof Water Near the Window
Now look upward. The roof may collect hundreds of litres of water during a substantial storm and concentrate that water through the gutter system. Follow the nearest downspout. Where does it terminate? Watch what happens when it rains. A downspout that releases concentrated roof runoff beside a basement window can place an unnecessary burden on the surrounding drainage. The precise corrective arrangement depends on the property, but the principle is straightforward: Roof water should be managed so it does not unnecessarily concentrate beside vulnerable foundation openings.Book A Free Inspection
Or
📞 Call Now for a Free Assessment
Understand What the Stone at the Bottom of a Well Does
Many window wells contain clean stone or gravel. This material isn't there merely for decoration. The spaces between appropriately sized stones allow water to migrate downward more readily than it would through compacted fine soil. But stone has limits. It doesn't destroy water. It doesn't magically transport water beyond the property. And it cannot make an obstructed drainage system functional. If a window well fills despite having plenty of gravel, adding another bag on top may simply reduce the remaining depth of the well. Investigate what is happening underneath.Determine Whether a Window-Well Drain Is Working
Some basement window wells incorporate drainage that carries water downward toward an appropriate drainage arrangement. If such a drain exists, determine whether it appears functional. Remove loose surface debris carefully. Look for accumulated:- Leaves
- Soil
- Mulch
- Sediment
- Organic material
What to Do When a Window Well Holds Water
Standing water is a significant diagnostic clue. If water remains in the well after rainfall, focus attention on water management before repeatedly resealing the interior window. Investigate:- How water enters the well
- Whether excessive surface runoff is reaching it
- Whether drainage exists
- Whether the drainage pathway is functioning
- Whether surrounding soil has changed
- Whether the well itself is damaged
Using a Window-Well Cover Correctly
A suitable cover can be a useful secondary defence. It can reduce direct entry of:- Rain
- Snow
- Leaves
- Twigs
- Other debris
Sealing the Window-to-Foundation Joint
Where the frame meets the foundation, a properly constructed joint helps prevent exterior water from moving into the opening. Inspect the existing material closely. A failing joint may show:- Separation
- Brittleness
- Cracking
- Missing sections
- Loss of adhesion
Choosing an Exterior Sealant
Basement windows experience a challenging environment. An exterior sealant may encounter moisture, ultraviolet exposure where uncovered, temperature changes, and movement between dissimilar materials. Choose a product specifically suitable for the application. Verify compatibility with both surfaces involved—for example, concrete or masonry on one side and the window-frame material on the other. Also check:- Application temperature
- Curing conditions
- Joint-width requirements
- Primer requirements
- Moisture limitations
- Exterior-use specifications
Preparing Old Joints Before Resealing
Preparation deserves its own section because it has such a large influence on the result. Where appropriate for the repair, deteriorated material should be removed rather than permanently entombed beneath successive layers. Clean away loose debris. Examine the underlying surfaces. Repair deterioration where necessary. Then prepare the joint according to the replacement product's instructions. This takes longer than simply squeezing sealant over the existing bead. It also produces a much more deliberate repair.Book A Free Inspection
Or
📞 Call Now for a Free Assessment
Repairing Deteriorated Concrete Around a Window
Sometimes the sealant isn't the problem. The material it is attached to is deteriorating. Concrete or masonry around an older basement window may contain small voids, broken edges, or previous repairs that no longer remain sound. Applying sealant to loose material creates a weak foundation for the repair. Damaged substrate may need appropriate restoration first. The repair material should be suitable for the existing foundation and environmental conditions. Once the surrounding opening is sound, perimeter waterproofing details can be addressed more effectively.Foundation Cracks Beside Window Openings
A crack near a basement window can easily masquerade as a window leak. Watch the crack during rainfall. Look for:- Darkening
- Mineral residue
- Previous water staining
- Dampness
- Evidence of movement
How to Waterproof Basement Windows From the Exterior
Exterior work focuses on controlling water before it reaches the interior finish. Depending on the diagnosed problem, this can involve attention to:- Frame perimeter
- Concrete opening
- Sill
- Window well
- Drainage
- Nearby foundation defects
- Surrounding surface-water management
What Interior Repairs Can Accomplish
Interior repairs have legitimate uses. A small opening around the inside of a frame may need finishing or sealing. Damaged interior materials may need restoration after the leak has been corrected. Interior inspection also provides important diagnostic evidence. However, think carefully before relying entirely on an inside repair where substantial water is accumulating outdoors. If exterior water continues reaching vulnerable parts of the assembly, the repair is being asked to resist conditions that may be better controlled earlier in the water pathway.Why Interior Caulking Sometimes Fails
Imagine that water is accumulating outside a basement window during every severe storm. A homeowner sees water entering at the bottom and applies interior caulk. The next storm arrives. The outside conditions haven't changed. Water still reaches the opening. Pressure and prolonged exposure continue. Perhaps the original spot stays dry but moisture appears nearby. The caulk didn't necessarily “fail” because it was poor quality. It may simply have been assigned the wrong job. This is why successful efforts to waterproof basement windows begin with diagnosis rather than sealant.Waterproofing Replacement Basement Windows
A replacement window provides an opportunity to address the entire opening. Don't focus exclusively on the window unit. The surrounding installation details are equally important. Consider:- Condition of the rough opening
- Frame placement
- Perimeter sealing
- Exterior sill details
- Adjacent concrete
- Window-well condition
- Drainage
Special Considerations for Egress Windows
Some basement windows are intended to provide emergency escape from bedrooms or other spaces. These installations require special attention because water management cannot compromise their safety function. The window, opening, and well need to remain usable as intended. Covers or other additions should not obstruct required escape. Large egress wells can also create sizeable below-grade openings where drainage becomes especially important. When modifying an egress installation, applicable requirements should be verified rather than treating it as an ordinary decorative basement window.Managing Snow Around Basement Windows
Winter creates a different water-storage mechanism. Snow. A large snowbank beside a basement window may remain harmless while temperatures stay below freezing. Then a warm period arrives. The stored snow becomes liquid water. If the ground remains partially frozen, infiltration can be limited and meltwater may move across the surface instead. Keeping large accumulations away from vulnerable window wells where practical can reduce the amount of meltwater reaching them.Preparing for Spring Snowmelt
Spring deserves special attention in York Region. Inspect window wells before the main thaw. Remove accumulated debris. Check whether visible drainage areas are clear. Inspect the surrounding ground as snow recedes. Watch for depressions created by settlement. Then inspect the basement during the thaw rather than waiting until summer. Seasonal moisture problems are easiest to understand while they are occurring.Book A Free Inspection
Or
📞 Call Now for a Free Assessment
Protecting Basement Windows During Severe Rain
A brief inspection before periods of heavy rain can catch surprisingly simple problems. Check:- Window wells for debris
- Covers for damage
- Nearby downspouts
- Visible drainage openings
- Exterior joints
- Sump equipment if the home uses it
When a Basement Window Needs Replacement
Not every leak requires a new window. Replacement becomes more reasonable when the window itself has substantial deterioration or cannot perform its intended function reliably. Potential concerns can include:- Severely damaged frames
- Extensive corrosion
- Rot
- Failed components
- Significant distortion
- Chronic problems associated with poor installation
- Need for an appropriately designed new opening
When the Window Is Innocent
One of the costliest mistakes is replacing the visible object without confirming it caused the problem. Water below a basement window can originate from:- Adjacent foundation cracks
- Hidden wall leakage
- Plumbing
- Moisture travelling behind finishes
- Other penetrations
- Condensation
Mistakes That Can Make Window Leaks Worse
Avoid several common shortcuts.Continually adding layers of caulk
Old failed material may need proper removal and preparation.Filling the entire window well with stone
This doesn't correct an obstructed or absent drainage pathway.Raising landscaping around the well
This can make it easier for runoff to enter.Permanently covering an important drainage opening
Water needs somewhere to go.Concealing stains immediately
They provide useful diagnostic information.Treating condensation as rain leakage
The remedies are different.Ignoring safety requirements around egress windows
Waterproofing should never compromise emergency use.A Step-by-Step Basement Window Inspection
When trying to waterproof basement windows, use a consistent inspection sequence. Step 1: Photograph the interior before rainfall. Step 2: Inspect the window frame, sill, and surrounding foundation. Step 3: Check the exterior perimeter joint. Step 4: Examine the window well. Step 5: Look at the stone and any visible drainage. Step 6: Compare the top of the well with surrounding grade. Step 7: Follow nearby downspouts and surface-water routes. Step 8: Observe the area during rainfall. Step 9: Record where moisture appears first. Step 10: Choose the repair based on the identified pathway. This process may take longer than buying a tube of sealant. It can also prevent several unsuccessful repairs.DIY Repairs vs. More Extensive Waterproofing
Certain maintenance tasks may be manageable for homeowners comfortable with basic exterior work. Examples include cleaning debris, observing drainage, maintaining well covers, and addressing appropriate minor sealing work according to product instructions. More substantial problems can require specialized work. Examples include:- Deep excavation
- Foundation drainage repairs
- Major concrete restoration
- Significant crack investigation
- Egress-window modifications
- Rebuilding deteriorated window wells
Preventive Maintenance
Once a basement window is dry, keep watching it. Inspect the area periodically and after significant changes to the property. Pay attention after:- Landscaping
- Patio construction
- Gutter replacement
- Window replacement
- Major storms
- Spring thaw
Book A Free Inspection
Or
📞 Call Now for a Free Assessment
Frequently Asked Questions About Waterproof Basement Windows
How can I waterproof basement windows?
Start by identifying how water reaches the opening. Inspect the exterior joint, concrete opening, sill, window well, drainage, surrounding grade, and nearby roof-water discharge. The appropriate repair depends on the pathway.Why is water coming through the bottom of my basement window?
Possible causes include water accumulating outside the lower frame, a deteriorated perimeter joint, sill problems, or water travelling from another location. Inspect the exterior during rainfall when possible.Can exterior caulk waterproof a basement window?
Appropriate sealant can correct certain perimeter-joint problems. It cannot compensate for a window well that repeatedly fills with water or another significant drainage problem.Why does my basement window leak only in major storms?
Severe rainfall creates more runoff and can expose drainage or sealing weaknesses that don't become apparent during ordinary rain. Observe the window well and surrounding exterior conditions during these events.Should I put gravel in my basement window well?
Appropriate clean stone can facilitate movement of water toward drainage, but stone alone doesn't provide a destination for water. Existing drainage conditions should also be evaluated.Will a window-well cover stop leaks?
A cover can reduce direct precipitation and debris entering the well. It should be viewed as supplementary protection rather than a replacement for effective water management.Can basement windows leak even when the window well is dry?
Yes. Water may enter through the frame perimeter, nearby concrete, a foundation crack, or another hidden route. Condensation can also produce moisture that resembles leakage.Should I replace a basement window that leaks?
Not automatically. Identify the source first. Replacing the window won't correct drainage, grading, or an unrelated foundation crack.Can basement windows be waterproofed from inside?
Some interior sealing and repair work may be appropriate, but exterior water accumulation should generally be investigated rather than relying solely on an interior barrier.What should I check first after discovering a basement window leak?
Document where the moisture appears, then inspect the corresponding exterior area, including the well, drainage, frame perimeter, surrounding foundation, grade, and nearby roof-water discharge.Waterproof Basement Windows in York Region
For homeowners in Newmarket, Aurora, Richmond Hill, East Gwillimbury, Bradford, Stouffville, King, Keswick, and surrounding York Region communities, basement windows can experience several very different moisture conditions throughout the year. Summer thunderstorms may deliver intense rainfall over a short period. Autumn leaves can accumulate in recessed wells. Winter introduces snow. Spring converts that stored snow back into water while ground conditions are changing. The appropriate strategy to waterproof basement windows should therefore account for more than the window unit. Think of the property as a sequence of water-management zones. First, consider where roof and surface water travel. Next, examine what happens immediately around the foundation. Then evaluate the window well and its drainage. Only after that should the frame, sill, and perimeter seals be considered in isolation. This outside-to-inside approach can help distinguish a small sealing defect from a larger drainage problem. It can also prevent unnecessary window replacement. A window that is constantly surrounded by water is being placed under difficult conditions. Improving those conditions can be just as important as improving the window. If water repeatedly appears around a basement window during storms or spring thaw, request a free inspection to determine whether the likely source is the window opening, window well, surrounding foundation, or drainage system before choosing a repair. This article provides general homeowner information. Window construction, foundation conditions, drainage arrangements, egress requirements, and suitable waterproofing methods vary by property.Book A Free Inspection
Or